Wednesday, 19 September 2012

Abstract Art

Wikipedia, sums up abstract art really well... "Abstract art uses a visual language of form, color and line to create a composition which may exist with a degree of independence from visual references in the world."


A little exersize i like to do, is ill look around me and find a series of objects. Then i select areas of the object, as if you "zoom-in" on them, and draw it on the page and keep adding different shapes and textures. Eventually, you will come up with somewhere very abstract that doesn't look like the objects you started with but gives you a sort of, template, to work with!

_________


Here are two websites where it takes you through some easy steps to painting or drawing abstract art:

http://www.wikihow.com/Create-a-Random-Abstract-Drawing

http://painting.about.com/od/stepbysteppaintingdemos/ss/KarenDayVath_7.htm

http://www.art-is-fun.com/how-to-paint-abstract-art.html

Still Waters & Blending


Here are two paintings using acrylics that i have done recently..


The most important feature of both is the blending of colours. Learning how to blend is probably one of the most important lessons to be learnt when working with paints. Blending is the gradual transition from one colour to another. 


Take a look at these images.


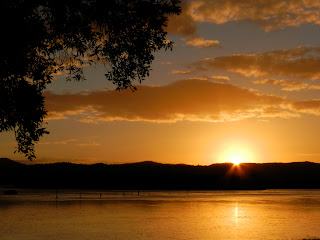
This image is blending colours everywhere!


It is a useful excersize to get some paints out and on a blank sheet of paper, try mixing colours and blending colours. If you look at any given image, there are almost always going to be darker shades of a colour and lighter shades of a colour. Learning how to paint this is a useful skill and will enhance your painting technique. 


Try looking at the colour wheel. Usually colours on opposites, when mixed, create nothing but a browny colour so unless that is what you want, try and avoid that.


Here is a link that teaches the basics in blending.


Oil Pastels


Oil pastels are a painting and drawing medium. They are made with a gum and methyl cellulose binder that consist of pigment mixed with a non-drying oil and wax binder.
The are similar to pastels and crayons except they are more difficult to blend.


You can use Oil Pastels on almost any surface such as paper, wood, metal, hardboard, canvas and glass.
A common technique is called layering, where you build up layers of colour creating a thicker texture. Turps is a liquid that some use to blend oil pastels, this allows a similar effect as the blending of watercolour paints.


One thing I've found is that oil pastels work really well on black paper.


Here is a duck i did on black paper:


Here is a link to tips and ideas on starting with oil pastels:


Tuesday, 18 September 2012

Photography


The Rule of Thirds is an important guideline to follow when taking any shot.


It divides the image up into three vertical lines and three horizontal lines and states that the subject of focal point of the photograph should be where the lines meet. (See the red dots above)
It creates interest in the main subject and believe it or not, when we are looking at an image the first thing studies have proven that we look at is not the centre. We usually follow the points in the image. 

Here are some examples...


Now, see if you can find the rule of thirds in these images...


Here are some images i have taken...


There is always a time for breaking the rules. This is an image i took in Auckland, NZ. When i took this shot i was actually running and not thinking about the rule of thirds. After getting feedback about the image, a lot of people thought it was the best one i took. So there is always a time for being creative and making things interesting.


Wall painting


Just painting some of the walls at work... this was a lot of fun to do!


My inspirations

Every artist needs their inspirations...

One of my favourites is a Russian-Israeli modern impressionistic artist called Leonid Afremov! He mainly uses palette knives and oil colours. I love how he uses bright colours and somehow still captures the reality of the picture.


For my own practice, i like to copy his paintings. I can never get them the same... but here are the examples.


Original (Leonid Afremov):

Mine:


Original (Leonid Afremov):


 Mine:


If you like these... try looking at some more of his awesome works here: Leonid Afremov

Fabric Painting

So i went to the reject shop the other day and found some fabric paints for $6, i then decided to go buy a plain top and see what i could come up with.


Step 1:

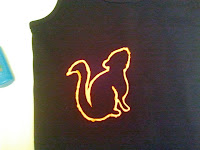
Firstly, think of a design or something fun you want to put on your shirt. I chose a squirrel, because a lot of my friends think i "squirrel away food for later".

Here are some links with cool ideas:
http://crafts.kaboose.com/shamrock-t-shirt.html
http://theslightlymadquiltlady.blogspot.com.au/2012/07/fabric-painting-on-windy-weekend.html
http://www.wardoliver.com/index%20header.htm


Step 2:

It is best to trace over an image and then cut it out just to avoid any big mistakes.


Step 3:

Time to apply the paint! Try and keep your arm steady...


Step 4:


Be creative!!


Watercolours


Watercolour paints are a different medium to oils and acrylics. They appear more transparent and luminous because of the pigments that are laid down on the paper. The concept behind watercolour painting is to add water to the paint. 

I have decided to try something a bit different and add water to acrylic paint and see if i get the same effect!


Things you will need:
- canvas
- water colour paints
- water colour brushes
- water
- paint pallete


Tips for Watercolour Painting:


1. Something to remember before you start... Water colour paints will always look darker when they are wet.

2. When water colours have dried, they still remain water soluble 

3. It's a good idea to always test a colour first before you put it onto your painting.

4. An important one: Remember to start with lighter colours then apply the darker ones. It is good to experiment and try dark to light but it's not recommended.

5. Water colour paints are transparent so it is hard to cover up mistakes.


Links:


Here is a website with different water colour painting excersizes to help improve your painting skills!


Here are a few links and videos to watch that i find really helpful when dealing with watercolours.

Watercolour red apple


Saturday, 15 September 2012

Pen and Wash

This is an extremely fun art technique which can be quite simple to achieve.

Things you will need:

- paper/canvas
- pencil + rubber
- water
- acrylic and/or watercolour
- paint pallet deep enough to mix some water in
- "run-free" pen (Sharpie's are good!)


STEP 1:


Firstly, find/create an image you want to use. It could be anything from..


an abstract...


an object...
 
to a landscape...


Here are some links with some more ideas:

http://fgsltwthghoaosj3.weebly.com/pen-and-watercolour-wash.html

http://barrycoombs.wordpress.com/tag/pen-and-wash/

http://kylie-3sheets.blogspot.com.au/2010/04/pen-wash.html

http://www.squidoo.com/watercolour-and-ink-drawing-sketching-painting-travel-sketchbook-journal


STEP 2:

Start by sketching with a pencil, the outline of your picture.
I have chosen to do a scene from the outback.  Here is my sketch.


STEP 3:

Then go over the pencil with your run-free pen, if you want to do shading, it is better to do hatching or cross hatching as opposed to just colouring in the desired area black.


STEP 4:
Now it's time to do the "wash" part. Choose a selection of colours you wish to use and mix them with water. Apply to selected area of painting.

The colours i am choosing is yellow, orange and red. It is best to start with the lightest colour and add darker tones as you go. 


Finished Product!


Additional Notes:

Here is a Slowmation i made of my own Pen and Wash, it doesn't go for long an takes you through the steps.
Here is the link...  My slowmation of Pen and Wash

Enjoy!